
Softball and baseball are very popular sports among kids and adults in the United States and all over the world. Over time, both of these sports have and are continuing to be more popular and more competitive. With a growing number of participants, playing at all levels from t-ball to professional, injuries are bound to occur. Some of the most commonly injured body regions in these sports include the shoulders, elbows, legs, knees, and ankles.
Rotator Cuff tendonitis aka Rotator Cuff Syndrome
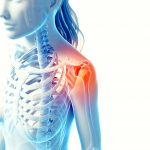
Rotator cuff tendonitis is a condition where there is inflammation in one or more of the tendons of the muscles in the rotator cuff.
What is the Rotator Cuff?
The muscles of the rotator cuff function to help stabilize the shoulder joint. The muscles are known as the “SITS” muscles and
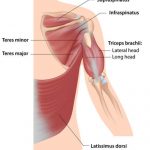
There are 4 muscles that comprise the rotator cuff
include:
Supraspinatus muscle
Infraspinatus muscle
Teres minor muscle
Subscapularis muscle
What are the symptoms of Rotator Cuff Tendonitis/ Rotator Cuff Syndrome?
People suffering from rotator cuff tendonitis or rotator cuff syndrome often feel a deep, dull, achy feeling and stiffness around the shoulder joint.
What Care causes of Rotator Cuff Tendonitis/Rotator Cuff Syndrome?

Repetitive throwing can lead to rotator cuff syndrome
Causes of this injury can include:
- repetitive overhead activity such as throwing a ball
- heavy lifting over a prolonged period of time as in power lifting or bodybuilding
- development of bone spurs due to repetitive shoulder activity such as playing tennis
How do you diagnose Rotator Cuff Tendonitis/ Rotator Cuff Syndrome?
Some special tests that we use to diagnose Rotator Cuff Tendonitis and Rotator Cuff Syndrome include:
Apley’s Scratch Test:
Reaching overhead with the effected arm to touch their back, and then reaching under and behind the shoulder. Pain with this test suggests Rotator cuff tendonitis.
Empty Can Test/ Supraspinatus Muscle Test:
Arm is brought out to 90 degrees in the scapular plane, internally rotate arm by pointing the thumb down towards the ground and resist as pressure is exerted down on the arm. This test is testing the integrity of the supraspinatus muscle. Pain is a positive sign.
Infraspinatus Muscle Test:
The arm is at your side with the elbow bent to 90 degrees, bring the arm in towards your stomach 45 degrees. Resist medial rotation force. Pain or the inability to resist medial rotation indicates a positive test for an infraspinatus strain.
Lift Off Test/ Subscapularis Muscle Test:
Place the back of the hand against mid-lumbar spine. Then lift the hand away from the back against resistance. An inability to perform this action indicates an injury of the subscapularis muscle.
Patte Test/Teres Minor Muscle Test:
Elevate the arm to 90 degrees in the scapular plane with the elbow flexed to 90 degrees and laterally rotate the shoulder. A positive test occurs with weakness and/or pain in the shoulder.
How is Rotator Cuff Tendonitis/ Rotator Cuff Syndrome treated?

Trying to strengthen tendonitis will only result in more pain and inflammation
I use a combination of passive therapies at the beginning of treatment and transition to active strengthening when appropriate. For example; if you have rotator cuff tendonitis and you try to strengthen a muscle that is inflammed it will only serve to promote more inflammation! The passive therapies we utilize include:
Therapeutic ultrasound – to dilate blood vessels and increase blood flow to the injured area.
ART/ Myofascial Release – to increase the blood flow to the area and increase the elasticity of the surrounding musculature.
Rock tape – used for added joint support.
Shoulder manipulation – to fix misalignments and joint subluxations. (If warranted)
After we see improvement and adequate healing with the passive therapies, we move into active therapies:

Rocktaping for the Shoulder
Isometric contractions – known to be beneficial for joint injuries. Isometric contractions do not allow for joint movement!
Concentric contractions – known to stimulate and repair muscle.
Eccentric contractions – known to help stimulate and repair tendon.
Impingement Syndrome aka Rotator Cuff Impingement Syndrome
Shoulder impingement syndrome, also called subacromial impingement syndrome, painful arc syndrome, supraspinatus syndrome, swimmer’s shoulder, and thrower’s shoulder, occurs when the tendons of the rotator cuff muscles become irritated and inflamed as they pass through the subacromial space. Because so many different names are used to describe this condition there is much confusion among patients and doctors when trying to gain an accurate diagnosis.
What the heck is the Subacromial Impingement Syndrome?
Bursitis will hurt in the front and side of shoulder and may hurt to lie on
The shoulder’s subacromial bursa is the largest bursa in the body and is susceptible to bursitis. This bursa is located below a part of the shoulder blade called the acromion.
What are the symptoms of Subacromial Impingement Syndrome?
Symptoms that are commonly associated with Subacromial Impingement Syndrome include pain and weakness in the arm when lifted sideways 60 degrees, pain in the front of the shoulder with direct pressure and the inability to lie on the effected arm.
How do you diagnose Subacromial Impingement Syndrome?
Neer’s Test:
Start with the arm down at the side of the body with the thumb pointed down, then slowly bring the arm up to the side of your head. Pain in the anterior part of the shoulder is indicative of Impingement Syndrome.
Painful Arc:
Slowly raise the arm from the side of the body until it is next to the ear. This test is considered positive if pain is reported between 60-120 degrees of scaption during elevation.
Subacromial Bursa Test/ Dawbarn’s Sign:
Point to the location of pain with the arm by the side. Lift the shoulder to 90 degrees and push in the same location where the pain was when the arm was down. If the pain is gone, this is positive for Subacromial Impingement Syndrome.
How do you treat Subacromial Impingement Syndrome?
The most important thing is to identify the activity and movements that are causing the impingement and then find ways to modify that specific activity. For example: it may hurt to throw the softball but the impingement may be caused by certain weightlifting techniques common in strength and conditioning routines. We can modify the strengthening program and then we can use sports therapies and exercise therapy to fix the condition and get you back to playing ball.
Passive treatments of Subacromial Impingement Syndrome include:
Interferential current stimulation – electrical current used to relax surrounding musculature and decrease pain.
Therapeutic ultrasound- used to dilate blood vessels to increase blood flow and promote healing.
Rock tape – used for added joint support.
After we see improvement and adequate healing, we move into active therapies:
Isometric contractions – known to be beneficial for joint injuries. Isometric contractions do not allow for joint movement!
Concentric contractions – known to stimulate and repair muscle.
Eccentric contractions – known to help stimulate and repair tendon.
Supraspinatus Syndrome
The Supraspinatus is the most commonly injured rotator cuff muscle
Supraspinatus Syndrome causes pain when elevating the arm and tenderness with deep pressure over the supraspinatus tendon; due to pressure of an injured or inflamed tendon or inflamed subacromial bursa coming into contact with the overlying acromion process of the scapula when the arm is elevated over the shoulder level.
What the heck is the Supraspinatus?
The supraspinatus is a relatively small muscle in the upper shoulder that runs from the supraspinatus fossa (superior portion of the scapula) to the greater tubercle of the humerus. It is one of the four rotator cuff muscles and its main action is to abduct the arm at the shoulder. The supraspinatus is the most commonly injured muscle of the rotator cuff group.
What are the symptoms of Supraspinatus Syndrome?
Supraspinatus syndrome usually causes pain in the top and front of the shoulder, limited range of motion, tenderness with pressure, and sometimes difficulty sleeping on the effected shoulder due to pain.
How do you diagnose Supraspinatus Syndrome?
Full Can Test:
Raise the arm in the scapular plane between 45-90 degrees with the shoulder externally rotated. Apply a downward force just proximal to the wrist while the patient resists. Test is positive if it elicits pain and/or weakness.
Empty Can Test/ Supraspinatus Muscle Test:
Elevate the arms to 90 degrees and horizontally adduct 30 degrees in the scapular plane with thumbs down to the empty can position. Provide downward pressure to test the patient’s strength in this position. A positive test for supraspinatus syndrome is pain.
How do you treat Supraspinatus Syndrome?
Passive treatments for Supraspinatus Syndrome include:
Interferential current stimulation – electrical current used to relax surrounding musculature and decrease pain.
Therapeutic ultrasound- used to dilate blood vessels to increase blood flow and promote healing.
Rock tape – used for added joint support. Tape is not effective if done incorrectly. Common errors or not enough or too much tension, improper joint position or failure to properly tape over the affected anatomy. Typically taping alone will not be enough to heal the Supraspinatus tendon.
After improvement and adequate healing are observed, active therapies include:
Isometric contractions – known to be beneficial for joint injuries. Isometric contractions do not allow for joint movement!
Concentric contractions – known to stimulate and repair muscle.
Eccentric contractions – known to help stimulate and repair tendon.
Painful Arc Syndrome
What the heck is the Painful Arc Syndrome?
Painful Arc Syndrome is characterized as pain that occurs in the shoulder as the arm is raised out to the side. The pain usually occurs when the arm is parallel to the floor and lasts until you move your arm overhead. This pain can happen while raising the arm and lowering the arm. Pain with these motions often indicates that the supraspinatus tendon and/or subacromial bursa is being pinched in the shoulder.
How do you diagnose Painful Arc Syndrome?
Painful Arc Test:
Slowly raise the arm from the side of the body until it is by the ear. This test is considered positive if pain is reported between 60-120 degrees of scaption.
An X-ray may be warranted in some situations to visualize the osseous structures of the shoulder.
How do you treat Painful Arc Syndrome?
Passive treatments of Painful Arc Syndrome include:
Interferential current stimulation – electrical current used to relax surrounding musculature and decrease pain.
Therapeutic ultrasound- used to dilate blood vessels to increase blood flow and promote healing.
Rock tape – used for added joint support.
After we see improvement and adequate healing, we move into active treatment:
Isometric contractions – known to be beneficial for joint injuries. Isometric contractions do not allow for joint movement!
Concentric contractions – known to stimulate and repair muscle.
Eccentric contractions – known to help stimulate and repair tendon.
Swimmer’s Shoulder
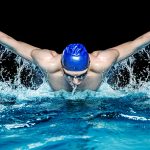
Some swimming styles lead to shoulder impingement
What the heck is the Swimmer’s Shoulder?
Swimmer’s shoulder is a problem commonly seen in the shoulder of competitive swimmers that presents as pain. Swimming is an unusual sport in that the shoulders and upper extremities are used for movement, requiring above average shoulder flexibility and range of motion for maximal efficiency. Swimmer’s shoulder is often associated with an undesirable increase in joint laxity. This leads to instability and shoulder impingement
What are the symptoms of Swimmer’s Shoulder?
Symptoms of Swimmer’s Shoulder include shoulder pain while swimming, tenderness in the acromioclavicular joint and coracoid process at the impinged area, and trigger points in the supraspinatus muscle/tendon.
How do you diagnose Swimmer’s Shoulder?
Neer’s Test:
Start with the arm down at the side of the body with the thumb pointed down, then slowly bring the arm up to the side of your head. Pain in the anterior part of the shoulder is indicative of Swimmer’s Shoulder. This is also a good test to assess the range of motion in the shoulders.
How do you treat Swimmer’s Shoulder?
Passive treatments of Swimmer’s Shoulder include:
Interferential current stimulation – electrical current used to relax surrounding musculature and decrease pain.
Therapeutic ultrasound- used to dilate blood vessels to increase blood flow and promote healing.
Rock tape – used for added joint support.
After we see improvement and adequate healing, we move into active therapies:
Isometric contractions – known to be beneficial for joint injuries. Isometric contractions do not allow for joint movement!
Concentric contractions – known to stimulate and repair muscle.
Eccentric contractions – known to help stimulate and repair the tendon.
Thrower’s Shoulder
What the heck is the Thrower’s Shoulder?
Overhand throwing places extremely high stresses on the shoulder, specifically to the structures that keep the shoulder stable. In sports like softball, baseball, and volleyball, these high stresses are repeated over and over and can lead to a wide range of injuries.
The shoulder is a ball-and-socket joint made up of three bones: the humerus, the scapula and the clavicle.
The head of the humerus fits into a rounded socket called the “glenoid” of the scapula. Surrounding the outside edge of the glenoid is a rim of strong, fibrous tissue called the labrum. The labrum deepens the socket and functions to help stabilize the shoulder joint.
The shoulder relies on tendons and muscles to keep the shoulder stable. The major muscles of the shoulder include the rotator cuff muscles:
Supraspinatus

The rotator cuff is comprised off Supraspinatus, Infraspinatus, Teres Minor and Subscapularis
Infraspinatus
Teres Minor
Subscapularis
The biceps muscle has two tendons that attach it to the scapula. The long head of the biceps attaches to the top of the glenoid. The short head of the biceps attaches to the coracoid process of the scapula. These attachments help to center the humeral head in the glenoid socket.
When athletes throw repeatedly at high speed, significant stresses are placed on the anatomical structures that keep the humeral head centered in the glenoid socket.
Of the five phases that make up the baseball pitching or throwing motion, the late cocking and follow-through phases place the greatest load of force on the shoulder.
Late-cocking phase – In order to generate maximum pitch or throwing speed, the thrower must bring the arm and hand up and behind the body. This arm position of extreme external rotation helps the thrower put speed on the ball, however, it also forces the head of the humerus to move forward, which places significant stress on the ligaments in the front of the shoulder. Over
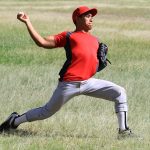
The forces on the shoulder while throwing can lead to injury
time with many repetitions, the ligaments loosen, resulting in greater external rotation and greater pitching speed, but less shoulder stability.
Follow-through phase – During acceleration, the arm rapidly rotates internally. Once the ball is released, the follow-through begins and the ligaments and rotator cuff tendons at the back of the shoulder must handle significant stresses to decelerate the arm and control the humeral head.
When one structure, such as the ligament system, becomes weakened due to repetitive stresses, other structures must handle the overload. As a result, a wide range of shoulder injuries can occur in the throwing athlete.
The rotator cuff and labrum are the shoulder structures most vulnerable to throwing injuries.
What are the symptoms of Thrower’s Shoulder?
The symptoms of a thrower’s shoulder can be quite complex in that it can present as pain, loss of performance, or deficits in strength and/or range of motion.
How do you diagnose Thrower’s Shoulder?
Assessment of shoulder range of motion, osseous adaptation via x-ray is necessary, and muscle strength testing.
Hawkins Kennedy
The arm should be flexed forward to 90 degrees then the shoulder should be forced into internal rotation. The test may be performed in different degrees of forward flexion or horizontal adduction. A positive test will elicit pain in the shoulder.
Infraspinatus Muscle Test:
The arm is at your side with the elbow bent to 90 degrees, bring the arm in towards your stomach 45 degrees. Resist medial rotational force. Pain or the inability to resist medial rotation indicates a positive test for an infraspinatus strain.
Sulcus Sign
With the arm straight down and relaxed at the side of the patient’s body, the elbow is grasped and traction is applied in an inferior direction. With excessive inferior translation, a depression occurs just below the acromion. This test is testing for shoulder instability.
Shoulder Apprehension Test:
The examiner stands at the involved side of the patient, grasps the wrist with one hand and passively externally rotates the humerus to end range with the shoulder in 90 degrees of abduction. Forward pressure is then applied to the posterior aspect of the humeral head by the examiner. A positive test for anterior instability is if the patient presents apprehension or if the patient reports pain.
O’Brien’s Test:
The shoulder should be flexed to 90 degrees with 10-15 degrees of horizontal adduction across the body with the thumb pointing down towards the floor. Downward pressure must then be applied to the extended arm. Pain and or clicking with this test is indicative of labrum damage.
How do you treat Thrower’s Shoulder?
Passive treatments of Thrower’s Shoulder include:
Interferential current stimulation – electrical current used to relax surrounding musculature and decrease pain.
Therapeutic ultrasound- used to dilate blood vessels to increase blood flow and promote healing.
Rock tape – used for added joint support.
After we see improvement and adequate healing, we move into active therapies:
Isometric contractions – known to be beneficial for joint injuries. Isometric contractions do not allow for joint movement!
Concentric contractions – known to stimulate and repair muscle.
Eccentric contractions – known to help stimulate and repair the tendon.
Shoulder stabilization exercises.
Impingement occurs most often with repetitive overhead movements such as throwing a ball, and movements required in sports like tennis, swimming, and lifting. Aside from sports, people will often feel pain while reaching up to put on a shirt or blouse, and will often report the inability to sleep on the injured side due to pain and discomfort. If not treated, the rotator cuff tendons can become thin, frayed, and possibly tear.
A condition known as shoulder bursitis can occur simultaneously with the impingement syndrome or may develop on its own.
Shoulder bursitis 
What the heck is shoulder bursitis?
Subacromial or shoulder bursitis is a condition caused by inflammation of the bursa that separates the superior surface of the supraspinatus tendon (one of the four tendons of the rotator cuff) from the overlying coracoacromial ligament, acromion, and coracoid and from the deep surface of the deltoid muscle.
What are the symptoms of shoulder bursitis or Subacromial bursitis?
Symptoms that are commonly associated with shoulder bursitis include pain and weakness in the arm when lifted sideways 60 degrees, pain in the front of the shoulder when pressure is applied directly and the inability to lay on the effected arm due to pain.
How do you diagnose shoulder bursitis? Tests? Special tests?
Neer’s Test:
Start with the arm down at the side of the body with the thumb pointed down, then bring the arm up to the side of your head. Pain in the anterior part of the shoulder is indicative of shoulder bursitis.
Painful Arc Test:
Slowly raise the arm from the side of the body until it is by the ear. This test is considered positive if pain is reported between 60-120 degrees of scaption.
Subacromial Bursa Test/ Dawbarn’s Sign:
Point to the location of pain with the arm by the side. Lift the shoulder to 90 degrees and push in the same location where the pain was when the arm was down. If the pain is gone, this is positive for shoulder bursitis.
How do you treat shoulder bursitis?
Passive treatments of shoulder bursitis include:
Interferential current stimulation – electrical current used to relax surrounding musculature and decrease pain.
Therapeutic ultrasound- used to dilate blood vessels to increase blood flow and promote healing.
Rock tape – used for added joint support.
After we see improvement and adequate healing, we move into active therapies:
Isometric contractions – known to be beneficial for joint injuries. Isometric contractions do not allow for joint movement!
Concentric contractions – known to stimulate and repair muscle.
Eccentric contractions – known to help stimulate and repair the tendon.
People with shoulder bursitis or Subacromial bursitis often complain of shoulder stiffness or achiness, and pain that hurts more with motion or with pressure and often pain that is worse at night. Common causes of bursitis include sports like baseball or softball and lifting heavy objects overhead repeatedly. With these movements, the bursa is pinched by the surrounding structures. If pinched chronically, the bursa becomes inflamed aka bursitis occurs.
Rotator Cuff Tear
What is the Rotator Cuff?
The muscles of the rotator cuff include:
The rotator cuff is comprised off Supraspinatus, Infraspinatus, Teres Minor and Subscapularis
Supraspinatus
Infraspinatus
Teres Minor
Subscapularis
A rotator cuff tear can occur acutely from a fall or trauma, or overtime with wear and tear causing degeneration of the tendon(s).This condition commonly occurs in people who are consistently doing activities that require the arms being over the head. People with this condition often sufferfrom pain at night, pain with rest, pain with lifting or lowering objects, weakness when lifting or rotating the arm, and crepitus when arm is put into certain positions.
There are different types of tears to take into consideration:
- Partial thickness tear – this is damage to the soft tissue but nothing is severed.
- Full-thickness tear aka complete tear– this type of tear severs the involved soft tissue into two pieces.
How do you diagnose Rotator Cuff Tendonitis/ Rotator Cuff Syndrome?
Some special tests that we use to diagnose Rotator Cuff Tendonitis and Rotator Cuff Syndrome include:
Apley’s Scratch Test:
Reach overhead with the effected arm to touch the back, and then reach under and behind the shoulder to touch the opposite side scapula. Pain with either motion suggests rotator cuff tendonitis.
Empty Can Test/ Supraspinatus Muscle Test:
Arm is brought out to 90 degrees in the scapular plane, internally rotate arm (as you would if you were emptying a can), and resist as pressure is exerted down in the arm. This test is testing the integrity of the supraspinatus muscle.
Infraspinatus Muscle Test:
The arm is at your side with the elbow bent to 90 degrees, bring the arm in towards your stomach 45 degrees. Resist medial rotation force. Pain or the inability to resist medial rotation indicates a positive test for an infraspinatus strain.
Lift Off Test/ Subscapularis Muscle Test:
Place the back of the hand against mid-lumbar spine. Then lift the hand away from the back against resistance. The inability to perform this action indicates an injury of the subscapularis muscle.
Patte Test/Teres Minor Muscle Test:
Elevate the arm to 90 degrees in the scapular plane with the elbow flexed to 90 degrees and laterally rotate the shoulder. A positive test occurs with weakness and/or pain.
How is rotator cuff tendonitis treated?
We use a combination passive therapies at the beginning of treatment and slowly transition into more active types of therapies. The passive therapies we utilize include:
Therapeutic ultrasound – to dilate blood vessels and increase blood flow to the injured area.
ART/ Myofascial Release – to increase the blood flow to the area and increase the elasticity of the surrounding musculature.
Rock tape – used for added joint support.
Shoulder manipulation – to fix misalignments and joint subluxations.
After we see improvement and adequate healing, we move into active therapies:
Isometric contractions – known to be beneficial for joint injuries. Isometric contractions do not allow for joint movement!
Concentric contractions – known to stimulate and repair muscle.
Eccentric contractions – known to help stimulate and repair the tendon.
An MRI may be warranted to determine the extent of this injury.
Bicipital tendonitis
Biceps tendonitis will hurt in the front of the shoulder and may radiate down the upper arm
What the heck is bicipital tendonitis?
Bicipital tendonitis is inflammation in the main tendon that attaches the biceps muscle to the shoulder. The most common cause is overuse from certain types of work or sports activities such as swimming, tennis, baseball, and softball.
What are the Symptoms of bicipital tendonitis?
People with this condition often suffer pain in the front of the shoulder, and pain when lifting or lowering objects.
How do you diagnose bicipital tendonitis?
Speeds Test:
The patient’s arm is flexed forward to 90 degrees and then the patient is asked to resist extension, first with the arm supinated, then with the arm pronated. A positive test presents as increased tenderness in the bicipital groove, especially with the arm supinated.
How do you treat bicipital tendonitis?
We use a combination passive therapies at the beginning of treatment and slowly transition into more active types of therapies. The passive therapies we utilize include:
Therapeutic ultrasound – to dilate blood vessels and increase blood flow to the injured area.
ART/ Myofascial Release – to increase the blood flow to the area and increase the elasticity of the surrounding musculature.
Rock tape – used for added joint support .
Shoulder manipulation – to fix misalignments and joint subluxations. (If warranted)
After we see improvement and adequate healing, we move into active therapies:
Isometric contractions – known to be beneficial for joint injuries. Isometric contractions do not allow for joint movement!
Concentric contractions – known to stimulate and repair muscle.
Eccentric contractions – known to help stimulate and repair the tendon.
Ulnar neuritis aka Ulnar neuropathy aka Cubital tunnel syndrome aka Ulnar Nerve Entrapment
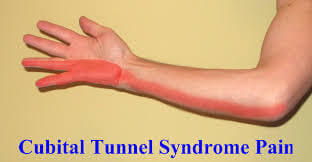
Nerve irritation at the elbow can cause symptoms along the entire nerve
What the heck is Ulnar neuritis?
Ulnar neuritis, or cubital tunnel syndrome, is characterized as inflammation of the ulnar nerve in the arm that often results in numbness or weakness in the hand. The ulnar nerve gives feeling to the little finger and half of the ring finger. The ulnar nerve also controls most of the little muscles in the hand that help with fine movements and some of the bigger muscles in the forearm that enable a strong grip.
What are the Symptoms of ulnar neuritis?
Ulnar neuritis often presents as elbow pain and tenderness, forearm pain, hand numbness, and hand weakness. It can cause a weakening of the grip and difficulty with fine movements of the fingers, such as holding a coffee cup, writing, and playing the guitar.
How do you diagnose ulnar neuritis?
This includes tapping over the nerve at the funny bone, checking to see if the ulnar nerve slides out of position when you bend your elbow, and checking for feeling and strength in your hands and fingers.
Tapping repeatedly on the ulnar groove on the inside of the elbow will cause pain into the hand if ulnar neuritis is present.
How do you treat ulnar neuritis?
We use a combination passive therapies at the beginning of treatment and slowly transition into more active types of therapies. The passive therapies we utilize include:
Therapeutic ultrasound – to dilate blood vessels and increase blood flow to the injured area and promote healing.
ART/ Myofascial Release – to increase the blood flow to the area and increase the elasticity of the surrounding musculature.
An elbow compression sleeve is often helpful.
Shoulder and Elbow manipulation – to fix misalignments and joint subluxations. (If warranted)
Nerve Glides/Nerve Flossing – to help free the entrapped nerve
After we see improvement and adequate healing, we move into active therapies:
Isometric contractions – known to be beneficial for joint injuries. Isometric contractions do not allow for joint movement!
Concentric contractions – known to stimulate and repair muscle.
Eccentric contractions – known to help stimulate and repair the tendon.
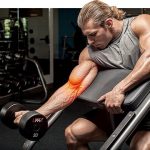
This condition is caused by entrapmentor over-stretching of the ulnar nerve at the elbow or wrist joints, oftencausing numbness or tingling into the ring and small fingers, pain in the forearm or around the elbow, and/or weakness in the hand. The ulnar nerve is especially vulnerable to compression at the elbow because it must travel through a small space called the cubital tunnel. Common causes of compression of the ulnar nerve include repetitive bending at the elbow such as throwing a baseball or softball (especially pitching), leaning on the elbow(s) for long periods of time, and sometimes from direct trauma to the inside of the elbow or wrist.
Medial Epicondylitis aka Little League Elbow aka Golfers Elbow
Medial epicondylitis, also known as Golfer’s elbow, Little league (baseball) elbow, or suitcase elbow, usually presents as pain on the inside the elbow, and sometimes pain on the inside of the wrist. This pain is caused by damage to the tendons that flex the wrist and palm towards the forearm. The muscle most often involved in this condition is the flexor carpi radialis, which connects the medial epicondyle of the humerus to the second and third metacarpal bones in the hand. Symptoms commonly associated with this condition include pain and tenderness on the inside of the elbow, stiffness in the elbow, and possible weakness in the wrist or hand. Common causes of this condition include throwing sports such as baseball and softball, weight training, racket sports and golf.
Medial Epicondylitis
What the heck is medial epicondylitis?
Medial epicondylitis causes pain that originates on the inside of the elbow aka the medial epicondyle. Most of the wrist flexors attach to one main tendon on the medial epicondyle.
What are the symptoms of medial epicondylitis?
Medial epicondylitis causes pain along the palmer side of the forearm, from the elbow to the wrist, on the same side as the little finger. The pain can be felt when bending the wrist toward the palm against resistance, or when making a fist.
How do you diagnose medial epicondylitis?
Medial Epicondylitis Test:
The fingers should be flexed in a fist position. The examiner should find the medial epicondyle with one hand and grasp the patient’s wrist with the other hand. The examiner then passively supinates the forearm and extends the elbow and wrist. A positive test will cause pain along the medial aspect of the elbow at the medial epicondyle.
How do you treat medial epicondylitis?
We use a combination passive therapies at the beginning of treatment and slowly transition into more active types of therapies. The passive therapies we utilize include:
Therapeutic ultrasound – to dilate blood vessels and increase blood flow to the injured area.
ART/ Myofascial Release – to increase the blood flow to the area and increase the elasticity of the surrounding musculature.
Elbow manipulation – to fix misalignments and joint subluxations. (If warranted)
Elbow brace – for support during aggravating activities.
After we see improvement and adequate healing, we move into active therapies:
Isometric contractions – known to be beneficial for joint injuries. Isometric contractions do not allow for joint movement!
Concentric contractions – known to stimulate and repair muscle
Eccentric contractions – known to help stimulate and repair the tendon
Little League Elbow
What the heck is little league elbow?
Little league elbow is an injury to the medial growth plate called the medial epicondyle in a young child. The repetitive stress of throwing causes injury to the growth plate cartilage and can cause inflammation of this tissue as well as alterations in the growth pattern of this growth center.
What are the symptoms of little league elbow?
Little League elbow will cause pain on the inner aspect of the elbow when throwing. The individual may also develop some swelling and localized tenderness. Little league elbow is commonly associated with decreased velocity and/or accuracy. Typically, the pain is of gradual onset, but occasionally can occur fairly quickly.
How do you diagnose little league elbow?
The diagnosis of Little League elbow is commonly made with a combination of a description of the symptoms as well as a physical examination. Again, there is typically localized tenderness over the medial aspect of the elbow. There is commonly pain while applying a stress to the medial ligaments.
Valgus Stress Test:
Pain with pressure exerted on the outside of the elbow pushing inward towards the body.
How do you treat little league elbow?
The most important treatment for little league elbow is to avoid throwing for a period of time to rest the injured structures and allow them to heal. This may take several weeks, but it is important to allow complete healing to prevent recurrent symptoms. It is also important to maintain range of motion during the rest period. It is imperative that during the rest period the athlete avoid other activities that may place a stress on the injured structures of the elbow. Once an athlete begins to throw again, it is important that he or she resume throwing in a gradual controlled manner. If a player ignores the symptoms and continues to throw despite pain, they are likely at increased risk for a fracture of the medial growth plate of the elbow, which could potentially require surgical intervention. During the resting period, treatment and therapies are necessary for proper and adequate healing. Beneficial therapies include:
Therapeutic ultrasound – to increase blood flow to the damaged structures.
Interferential current – for muscle relaxation and decrease of pain.
Rock tape – for added joint support.
Golfers Elbow
What the heck is golfers elbow?
Golfer’s elbow presents as pain and inflammation in the tendons that connect the forearm to the elbow. The pain originates from the medial epicondyle and may radiate down into the forearm.
What are the symptoms of golfers elbow?
Pain that originates near the medial epicondyle. Sometimes the pain may extend all along the inner forearm. The elbow may become stiff, and you’re most likely to feel the pain when the wrist is flexed towards the body. Sometimes, the sensation of pins and needles, tenderness, and tingling may extend down into the fingers. In most cases, the pain becomes gradually worse.
How do you diagnose golfers elbow?
Golfer’s Elbow Test:
The fingers should be flexed in a fist position. The examiner needs to palpate the medial epicondyle with one hand and grasps the patient’s wrist with the other hand. The examiner then passively supinates the forearm and extends the elbow and wrist. A positive test is pain along the medial aspect of the elbow in the region of the medial epicondyle.
How do you treat golfers elbow?
We use a combination passive therapies at the beginning of treatment and slowly transition into more active types of therapies. The passive therapies we utilize include:
Therapeutic ultrasound – to dilate blood vessels and increase blood flow to the injured area.
ART/ Myofascial Release – to increase the blood flow to the area and increase the elasticity of the surrounding musculature.
Elbow manipulation – to fix misalignments and joint subluxations. (If warranted)
After we see improvement and adequate healing, we move into active therapies:
Isometric contractions – known to be beneficial for joint injuries. Isometric contractions do not allow for joint movement!
Concentric contractions – known to stimulate and repair muscle.
Eccentric contractions – known to help stimulate and repair the tendon.
Lateral Epicondylitis aka Tennis Elbow
Lateral epicondylitis, also commonly known as tennis elbow, is a painful condition involving the tendons that attach to the bone on the outside (lateral) part of the elbow. Tendons anchor the muscle to bone. The muscle most often involved in this condition is the extensor carpi radialis brevis, which helps to extend the hand and stabilize the wrist. With lateral epicondylitis, there is irritation at the tendon’s attachment onto the lateral epicondyle of the humerus, weakening the anchor site and placing greater stress on the area. This causes pain when this muscle is activated. Activities such as lifting, gripping, painting, using a screwdriver, repetitive computer mouse use, and sports or activities that require repetitive movements of the wrists or hands often cause discomfort.
Lateral Epicondylitis
What the heck is lateral epicondylitis?
Lateral Epicondylitis is inflammation of the tendons that join the forearm muscles on the outside of the elbow aka lateral epicondyle. The elbow joint is a joint made up of three bones: the humerus, and the two bones in your forearm, the radius and the ulna. There are bony bumps at the bottom of the humerus called epicondyles. The bony bump on the outside (lateral side) of the elbow is called the lateral epicondyle.
Muscles, ligaments, and tendons hold the elbow joint together.
Lateral epicondylitis involves the muscles and tendons of your forearm. The forearm muscles act to extend the wrist and fingers. Forearm tendons, also known as extensors, attach the muscles to bone. These tendons attach on the lateral epicondyle. The tendon usually involved in tennis elbow is called the Extensor Carpi Radialis Brevis.
What are the symptoms of lateral epicondylitis?
Symptoms of lateral epicondylitis often include pain or burning on the outer part of the elbow, and weak grip strength.
How do you diagnose lateral epicondylitis?
Cozen’s Test:
The examiner must stabilize the patient’s elbow with their thumb while palpating the lateral epicondyle. The patient is then asked to actively make a fist, pronate the forearm as well as radially deviate and extend the wrist against a counterforce that is being applied by the examiner. A positive test is the reproduction of pain near the lateral epicondyle.
How do you treat lateral epicondylitis?
We use a combination passive therapies at the beginning of treatment and slowly transition into more active types of therapies. The passive therapies we utilize include:
Therapeutic ultrasound – to dilate blood vessels and increase blood flow to the injured area.
ART/ Myofascial Release – to increase the blood flow to the area and increase the elasticity of the surrounding musculature.
Elbow brace may be beneficial.
Elbow manipulation – to fix misalignments and joint subluxations. (If warranted)
After we see improvement and adequate healing, we move into active therapies:
Isometric contractions – known to be beneficial for joint injuries. Isometric contractions do not allow for joint movement!
Concentric contractions – known to stimulate and repair muscle.
Eccentric contractions – known to help stimulate and repair the tendon.
Tennis Elbow
What the heck is tennis elbow?
Tennis elbow is inflammation of the tendons that join the forearm muscles on the outside of the elbow aka lateral epicondyle. The elbow joint is a joint made up of three bones: the humerus, and the two bones in your forearm, the radius and the ulna. There are bony bumps at the bottom of the humerus called epicondyles. The bony bump on the outside (lateral side) of the elbow is called the lateral epicondyle.
Muscles, ligaments, and tendons hold the elbow joint together.
Lateral epicondylitis, or tennis elbow, involves the muscles and tendons of the forearm. The forearm muscles act to extend your wrist and fingers. Forearm tendons, also known as extensors, attach the muscles to bone. They attach on the lateral epicondyle. The tendon usually involved in tennis elbow is called the Extensor Carpi Radialis Brevis.
What are the symptoms of tennis elbow ?
Symptoms often include pain or burning on the outer part of the elbow, and weak grip strength.
How do you diagnose tennis elbow?
Cozen’s Test:
The examiner must stabilize the patient’s elbow with his/her thumb while palpating the lateral epicondyle. The patient is then asked to actively make a fist, pronate their forearm as well as radially deviate and extend the wrist against a counterforce that is being applied by the examiner. A positive test is the reproduction of pain near the lateral epicondyle.
How do you treattennis elbow ?
We use a combination passive therapies at the beginning of treatment and slowly transition into more active types of therapies. The passive therapies we utilize include:
Therapeutic ultrasound – to dilate blood vessels and increase blood flow to the injured area.
ART/ Myofascial Release – to increase the blood flow to the area and increase the elasticity of the surrounding musculature.
Elbow brace is often beneficial.
Elbow manipulation – to fix misalignments and joint subluxations. (If warranted)
After we see improvement and adequate healing, we move into active therapies:
Isometric contractions – known to be beneficial for joint injuries. Isometric contractions do not allow for joint movement!
Concentric contractions – known to stimulate and repair muscle.
Eccentric contractions – known to help stimulate and repair the tendon.
Meniscus Tear
What is a meniscus?
The meniscus is a piece of cartilage that provides a cushion in the knee joint between thefemur and the tibia. There are two menisci in each knee. These cushions can be damaged or torn during activities where the foot is planted and rotation at the knee occurs.
If there is a tear in the meniscus the individual will oftenfeel pain, stiffness, and a limited range of motion, and or “catching” in the effected knee. There are 3 types of tears that occur to the meniscus. Grades 1 & 2 are not considered serious, however a grade 3 tear is considered serious and may require surgery.
How is a meniscus tear diagnosed?
McMurrey’s Test:
The patient must lie on their back with the effected knee completely flexed.
The examiner then medially rotates the tibia and extends the knee. If there is a loose fragment of the lateral meniscus, this action causes a snap or click that is often accompanied by pain. By repeatedly changing the amount of flexion and then applying medial rotation to the tibia followed by extension, the examiner can test the entire posterior aspect of the meniscus from the posterior horn to the middle segment. To test the medial meniscus, the examiner performs the same procedure with the knee laterally rotated.
Palpation of the medial and lateral joint lines:
If there is a meniscus injury, pinpoint tenderness will be felt at the location of the injury.
Orthopedic testing is necessary for the proper diagnosing this injury, and an MRI may be warranted for further information of the extent of the injury.
How is a meniscus tear treated?
If the tear is a grad 1 or 2, conservative treatment is an option. Conservative treatment should include passive and active treatments:
Therapeutic ultrasound – to dilate blood vessels and increase blood flow to the injured area.
ART/ Myofascial Release – to increase the blood flow to the area and increase the elasticity of the surrounding musculature.
Rock tape – used for added joint support.
Hip, Knee and Foot manipulation – to fix misalignments and joint subluxations.
After we see improvement and adequate healing, we move into active therapies:
Isometric contractions – known to be beneficial for joint injuries. Isometric contractions do not allow for joint movement!
Concentric contractions – known to stimulate and repair muscle.
Eccentric contractions – known to help stimulate and repair the tendon.
Medial Collateral Ligament & Lateral Collateral Ligament Sprain or Tear
What are the collateral ligaments of the knee?
The collateral ligaments are on either side of the knee, connecting the femur to the tibia, and work to limit side-to-side (lateral) motion. This type of injury occurs when taking a hit from the inside or outside of the knee causing an abnormal amount of stress and stretch to the ligament, resulting in a sprain or tear. This can occur when sliding into bases in softball, or if there is a collision at home plate between a runner and the catcher.
What are the symptoms of a collateral ligament sprain or tear in the knee?
With this injury, a person will feel discomfort on whichever side of the knee that the injury took place, possible swelling around the knee and a feeling of the knee being unstable at times.
How is a collateral ligament injury diagnosed in the knee?
Valgus Stress test:
Pressure should be placed in the outside of the knee while it is extended. At the same time, pull the ankle away from the body. Pain on the inside of the knee is indicative of a medial collateral ligament injury.
Varus Stress Test:
Pressure should be placed in the inside of the knee while it is extended. At the same time, pull the ankle towards the body. Pain on the outside of the knee is indicative of a lateral collateral ligament injury.
An MRI may be warranted to help determine the extent of the injury.
How are collateral ligament injuries treated?
Passive therapies are required for the first 3-6 weeks, then active therapies can slowly be implemented:
Therapeutic ultrasound – to dilate blood vessels and increase blood flow to the injured area.
Interferential Current – to relax surrounding musculature and decrease pain.
ART/ Myofascial Release – to increase the blood flow to the area and increase the elasticity of the surrounding musculature.
Transverse friction massage – to increase blood flow to the area.
Rock tape – used for added joint support.
After we see improvement and adequate healing, we move into active therapies:
Isometric contractions – known to be beneficial for joint injuries. Isometric contractions do not allow for joint movement!
Concentric contractions – known to stimulate and repair muscle.
Eccentric contractions – known to help stimulate and repair the tendon.
Hamstring Strain
What is a hamstring strain?
A hamstring strain occurs when muscle fibers of the hamstring musculature become torn. The hamstring muscles are responsible for knee flexion. This type of injury occurs when the hamstring muscles are contracted quickly such as in sprinting, causing muscle fibers to become torn.
The hamstring muscles include:
Semitendinosus
Biceps Femoris
Semimembranosus
What are the symptoms of a hamstring strain?
This injury will usually cause burning or sharp sensations, cramping pains and bruising, depending on the severity of the injury. The pain can be anywhere in the muscle, starting from just below the SITS bone near the gluteus muscle all the way down to just below the knee. There are 4 muscles of the hamstring: Biceps Femoris long and short heads, Semitendonosis and Semimembranosus. The Biceps femoris muscle is the most common hamstring muscle to be involved in this condition. An individual with this condition will feel discomfort with activities that require quick contraction of the muscle group such as running, sprinting, kicking and jumping. Improper warm-up and stretching of the hamstrings can result in this injury.
How is a hamstring strain diagnosed?
Hamstring muscle test:
The patient must resist downward pressure exerted on the ankle by engaging the hamstrings. If a strain is present, pain will occur at the location of injury.
How are hamstring strains treated?
Therapeutic ultrasound – to dilate blood vessels and increase blood flow to the injured area.
Interferential Current – to relax surrounding musculature and decrease pain.
ART/ Myofascial Release – to increase the blood flow to the area and increase the elasticity of the surrounding musculature.
Rock tape – used for added joint support.
After we see improvement and adequate healing, we move into active therapies:
Isometric contractions – known to be beneficial for joint injuries. Isometric contractions do not allow for joint movement!
Concentric contractions – known to stimulate and repair muscle.
Eccentric contractions – known to help stimulate and repair the tendon.
Specific stretching routine.
Grading of a hamstring tear:
Grade 1 –a small number of muscle fibers are torn, causing some pain and discomfort, but full function is still present. Bruising may be present with this grade.
Grade 2 – a significant number of muscle fibers are torn, bruising is present with pain and moderate loss of function.
Grade 3 – The muscle is ruptured resulting in severe bruising, severe pain and loss of function.
If an individual suffers multiple hamstring strains without proper treatment, this “tendonitis” can turn into “tendonosis”. Tendonosis is defined as chronic muscle tears resulting in thickening and scarring of the tendon.
It is important to find out which condition you have, in order to get the proper treatment for adequate healing.
Quadriceps Strain
What is a quadriceps strain?
This condition can occur when the quadricep is suddenly contracted and stretch is applied resulting in excessive tension on the muscle fibers causing them to tear.
What muscles are included in the quadriceps muscle group?
Rectus Femoris
Vastus intermedius
Vastus medialis
Vastus lateralis
What are the symptoms of a quadriceps strain?
When a quadriceps strain occurs, the person will feel a burning or sharp sensation, a cramping feeling in the front of the thigh, and possible bruising depending on the severity of the strain. With a quadriceps strain, there will be increased discomfort with activities that stress the quadriceps requiring quick muscle contraction, some of which include running, jumping, kicking, and going up and down stairs. Improper warm-up and stretching can result in this injury.
How is a quadriceps strain diagnosed?
Quadriceps Muscle Test:
The patient must resist downward pressure by engaging the quadriceps muscles. Pain in the quadriceps region is indicative of a strain.
How is a quadriceps strain treated?
Therapeutic ultrasound – to dilate blood vessels and increase blood flow to the injured area.
Interferential Current – to relax surrounding musculature and decrease pain.
ART/ Myofascial Release – to increase the blood flow to the area and increase the elasticity of the surrounding musculature.
Rock tape – used for added joint support.
After we see improvement and adequate healing, we move into active therapies:
Isometric contractions – known to be beneficial for joint injuries. Isometric contractions do not allow for joint movement!
Concentric contractions – known to stimulate and repair muscle.
Eccentric contractions – known to help stimulate and repair the tendon.
Specific stretching routine.
Grading of a quadriceps tear:
Grade 1 – a small number of muscle fibers are torn, causing some pain and discomfort, but full function is still present. Bruising may or may not be present.
Grade 2 – a significant number of muscle fibers are torn, with pain and moderate loss of function. Bruising will be present with this grade of strain.
Grade 3 – The muscle is ruptured resulting in severe bruising, severe pain and loss of function.
Ankle sprain
This condition occurs when the ankle is twisted, rolled, or put into an abnormal position with stress applied. These motions cause excessive stretching and sometimes tearing of the ligaments in the ankle, which act to provide stability to the ankle joint. In most cases, the ankle is rolled inward and it is the ligaments on the outside of the ankle that are involved which include the anterior talofibular ligament, calcaneofibular ligament, and the posterior talofibular ligament.
These ankle sprains occur most often while running bases and running in the outfield while playing softball.
How is an ankle sprain diagnosed?
Manual muscle testing in the individual muscles and stress tests of the individual ligaments must be performed.
What is the treatment of an ankle sprain?
Therapeutic ultrasound – to dilate blood vessels and increase blood flow to the injured area.
Interferential Current – to relax surrounding musculature and decrease pain.
Transverse friction massage – to increase blood flow to the injured area.
Rocktape – used for added joint support.
After we see improvement and adequate healing, we move into active therapies:
Isometric contractions – known to be beneficial for joint injuries. Isometric contractions do not allow for joint movement!
Concentric contractions – known to stimulate and repair muscle.
Eccentric contractions – known to help stimulate and repair the tendon.
Specific stretching and strengthening routine.
Grading of ankle sprains:
Grade 1 – This is a partial tear of a ligament. This will result in mild tenderness and swelling, slight to no functional loss and the individual will be able to bear weight with little discomfort. This type of sprain is considered stable.
Grade 2 – This is an incomplete tear of a ligament. There will be more pain and swelling than a grade 1, mild bruising, and tenderness over the involved ligament(s). There will be pain with bearing weight and movement. This grade has mild instability.
Grade 3 – This is a complete tear of a ligament(s) with loss of integrity. This will result in severe swelling, severe bruising, and loss of function with inability to bear weight. This grade is unstable.
An x-ray or MRI may be necessary determine the extent of the injury.
To schedule and appointment with Dr. Allen D.C. call:858-268-8525